Find the correct screen, complete the workflow, understand what AI changes, and see where each entry goes next.
15Documented sections
6Verified app screens
15Process flows
5Known role levels
15 of 15 guide sections shown
01
Start here
Start here: What Conscious Log does
Conscious Log turns thoughts, worries, decisions, images, documents, voice notes, drawings, lists, and check-ins into a searchable personal record that can become a LifeTilo task, memory, learning card, or content item.Public User Guide Link
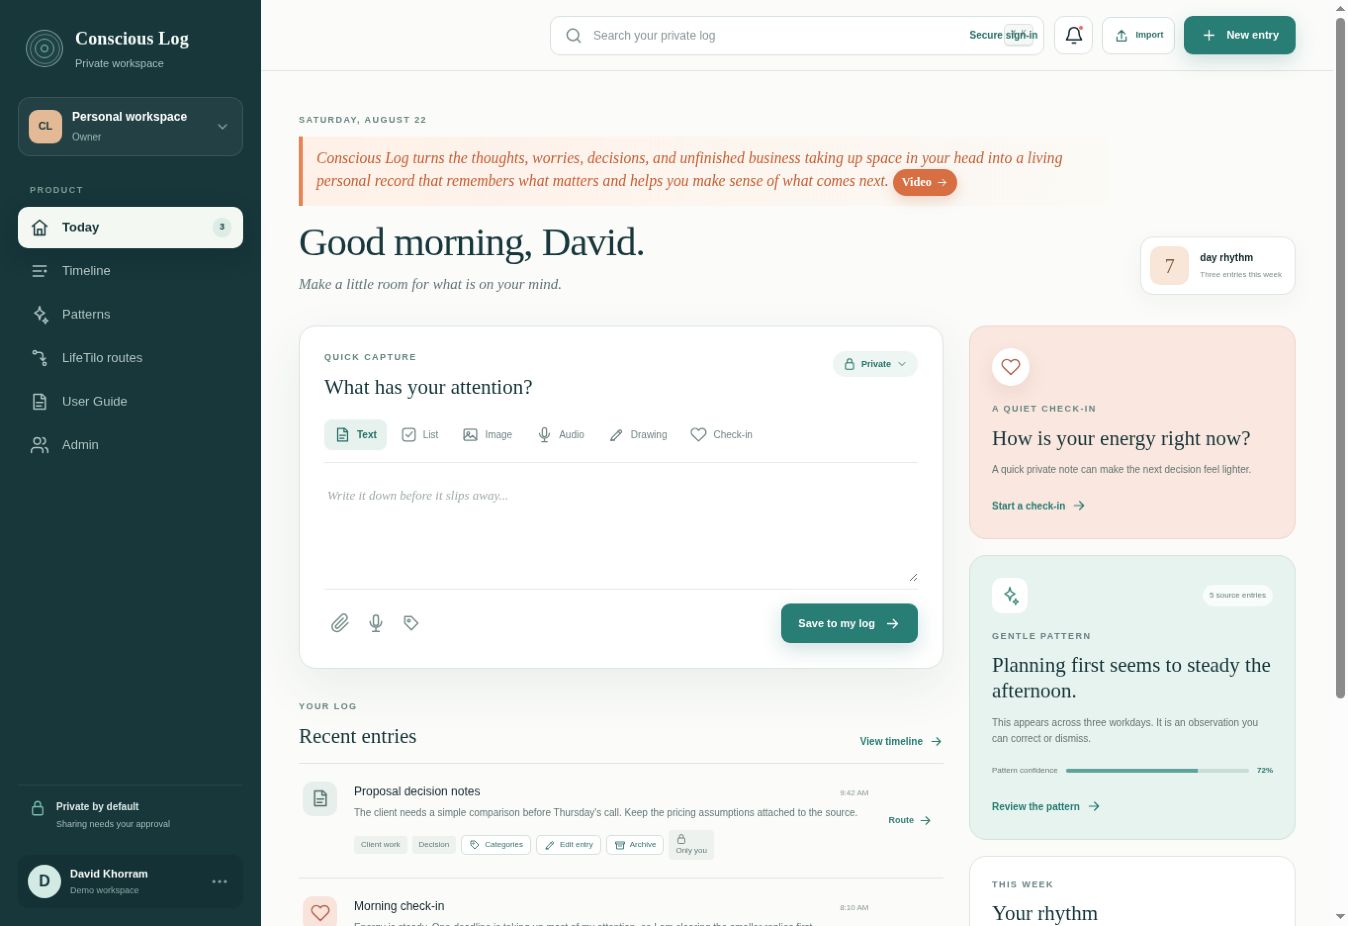
Today is the operating center for capturing and reviewing new entries.Verified screen, demo workspace, August 22, 2026
Each saved item is an entry. An entry has a title, body, time, privacy setting, optional categories, and optional media.
The operating loop is Capture, AI review, human review, save, organize, route, and reuse. The original Conscious Log entry remains available after routing.
The app is multiuser and multitenant. Workspace membership, roles, teams, sharing choices, and tenant boundaries control access.
Process flow
1Thought or source
2Capture
3AI and human review
4Saved entry
5Organize or route
Text alternative: Thought or source. Then Capture. Then AI and human review. Then Saved entry. Then Organize or route.
Core records and terms
Record
Purpose
Key fields
Next destination
Entry
Preserves the original capture
Title, body, type, privacy, categories, media
Timeline or LifeTilo route
Media asset
Keeps an image, drawing, audio file, or document
Filename, kind, size, analysis state
Entry and routed attachment
Route
Records an approved handoff
Destination, source entry, status, count
Task, Memory, Learning Card, Content
Step by step
1
Sign in with the approved identity for your workspace.
2
On Today, choose Text, List, Image, Drawing, Audio, or Check-in.
3
Enter or capture the information, review any AI-created text, then press Save to my log.
4
Find the saved entry under Recent entries or Timeline, add categories, share it if needed, or route it to LifeTilo.
Evidence and limitsVerified in the current application. Billing plans, public API access, and external guest access are not currently presented as end-user features.
02
Start here
Getting started and sign-in
A workspace owner creates the tenant, invites members, and assigns each person a role. Invited people sign in using the same email address that received the invitation.
The workspace switcher shows the active tenant and role. Primary navigation remains on the left on desktop.Verified screen, Owner demo role
A pending invitation becomes accepted after the first matching sign-in. Admin can see Pending, Accepted, Active, or Expired status and can resend a pending invitation.
The left navigation opens Today, Timeline, Patterns, LifeTilo routes, User Guide, and Admin. The top bar provides private-log search, notifications, Import, and New entry.
Private by default means a new entry starts as Only me. The author must deliberately select people, teams, or the organization before other members can read it.
Process flow
1Admin invitation
2Matching sign-in
3Membership accepted
4Workspace opens
5First private entry
Text alternative: Admin invitation. Then Matching sign-in. Then Membership accepted. Then Workspace opens. Then First private entry.
Step by step
1
Open the Conscious Log URL and select Secure sign-in if prompted.
2
Use the email address listed in Admin under People.
3
Confirm the workspace name and role in the left workspace switcher.
4
Open Today and save a first text note, then confirm it appears in Recent entries.
Evidence and limitsIf an invitation remains Pending after sign-in, confirm that the signed-in email exactly matches the invited address.
03
Capture
Capture types and Save to my log
The Today composer supports six capture types. Save behavior changes by input type while producing the same core entry record.
Choose the input type, review the content and privacy setting, then use Save to my log.Tested visual behavior in agent preview
Text: AI corrects spelling, grammar, clarity, and coherence, shows the corrected draft, then saves the approved text.
List: each line becomes a checklist item and keeps its checked state.
Image: mobile users can take a picture or choose one. AI reads visible text, understands the picture, proposes a title, and places a description in the caption area for review.
Drawing: the drawing canvas is stored as image media with the note text.
Audio: the browser records audio and may create a live transcript when speech recognition is supported. The transcript becomes the entry body.
Check-in: stores the selected energy score, current feeling, and note as a restricted check-in entry.
Process flow
1Choose input
2Enter or attach
3Validate and analyze
4Review result
5Save and confirm
Text alternative: Choose input. Then Enter or attach. Then Validate and analyze. Then Review result. Then Save and confirm.
Capture field dictionary
Field
Required
Who edits
Validation and effect
Title
Yes at save
User or AI proposal
Maximum 160 characters, carried into routes
Body
Depends on type
User, transcript, or AI proposal
Stored as entry content and routed notes
Privacy
Yes
Entry owner
Private, people or teams, organization
Media
No
Entry owner
Type and size checked before chunked upload
Step by step
1
Choose the capture type.
2
Enter text or select the media source.
3
For media, wait for the preview or AI status and review the proposed caption.
4
Choose categories and sharing if needed.
5
Press Save to my log. A saved confirmation includes the generated title.
6
Open Recent entries to confirm the entry and its attachment are present.
Evidence and limitsIf AI is unavailable, the entry and attachment can still save. The card shows a retry action and the specific setup, credit, key, connection, or rate-limit condition.
04
AI
AI editing, image reading, and document summaries
AI improves user-provided text and creates useful descriptions from supported media while leaving the human in control of the final saved record.
Text cleanup uses the configured editor instruction and returns corrected text only. The user reviews the result and presses Save corrected text.
Image analysis uses a vision-capable OpenAI model. It extracts visible wording, describes what the image communicates, and generates a short title.
PDF, DOCX, DOC, TXT, and Markdown attachments can be summarized. The summary becomes the body and the original file remains attached.
Admin selects the default model and purpose-specific models under Model routing. AI usage shows calls, tokens, estimated USD cost, date range, and per-user totals.
Process flow
1User content
2Authorized model route
3AI proposal
4Human edit or retry
5Final stored value
Text alternative: User content. Then Authorized model route. Then AI proposal. Then Human edit or retry. Then Final stored value.
Before and after AI
Input
AI proposal
Human decision
Final evidence
Rough text
Corrected sentence and title
Edit or save corrected text
Versioned title and body
Picture
Visible text, description, title
Edit caption or retry
Entry plus image
Document
Summary and title
Review or retry
Entry plus original attachment
Step by step
1
Admin opens Admin, then Model routing.
2
Select a default model and optional model for Text cleanup, Capture title, Image description, Document summary, Audio transcription, or Assistant.
3
Confirm the OpenAI API key is configured and the API account has available credits.
4
Save routing, return to Today, and test with a small image containing readable text.
Evidence and limitsFor image reading, use the least expensive configured model that supports image input. A text-only model cannot inspect a picture.
05
Organize
Recent entries: review and edit
Recent entries gives a quick view of the newest active records immediately below the Today composer.
Recent entries provide immediate confirmation after save and expose Edit, Categories, Archive, and Route.Verified screen
Each row shows the generated or edited title, body preview, time, privacy, categories, route state, and media status.
Edit entry changes the title and body. If media is attached, the editor also offers Remove picture or Remove attachment.
Categories can be added or edited without leaving the card. Archive hides the record from active lists while keeping it recoverable in Timeline.
Try AI analysis reruns media review when setup or processing previously failed.
Process flow
1Save succeeds
2Recent entry appears
3Review
4Edit or categorize
5Route or retain
Text alternative: Save succeeds. Then Recent entry appears. Then Review. Then Edit or categorize. Then Route or retain.
Step by step
1
Locate the entry under Recent entries.
2
Select Edit entry, change the title or body, and optionally mark the media for removal.
3
Press Save changes.
4
Confirm the updated title and body appear on the card.
Evidence and limitsA manual edit creates a new saved version and audit event. Removing media removes it from the visible entry.
06
Organize
Timeline, cards, search, and archive
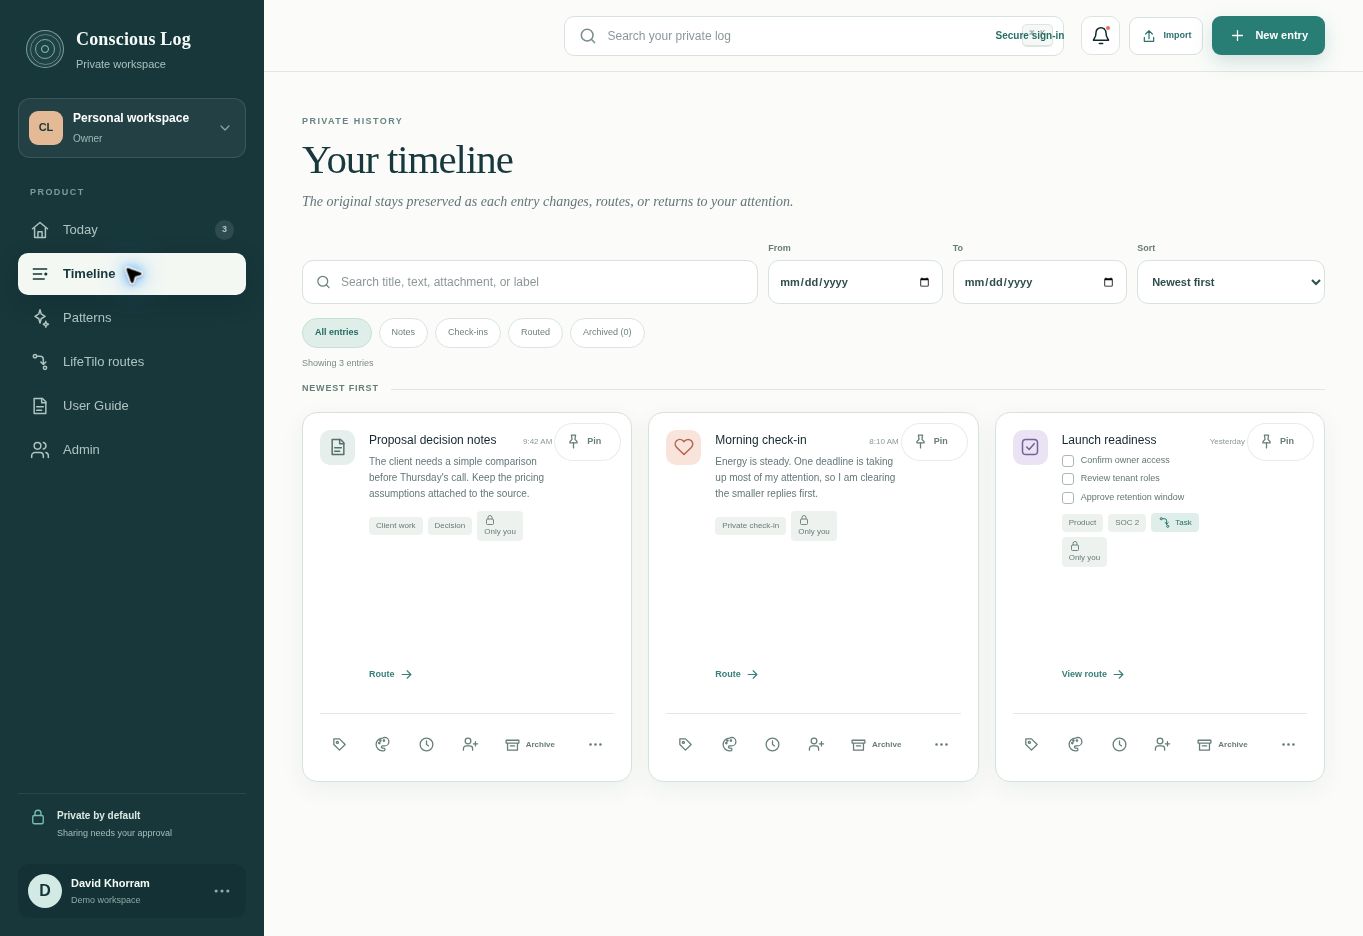
Timeline is the searchable history of Conscious Log entries, presented as compact Google Keep-style cards.
Timeline combines retrieval controls with Google Keep-style cards and their action bars.Verified screen and tested navigation
Search matches title, body, attachment filename, and category. From and To dates restrict the result set, and Sort changes chronological order.
Filters show All entries, Notes, Check-ins, Routed, or Archived. Pinned cards remain at the top.
Long card text is shortened. Select the blue See More link to open a half-screen reader with scrolling, then choose Edit entry when changes are needed.
Card controls include Pin, Categories, Background, Reminder, Collaborator, Archive, and More. More contains Edit, Make a copy, Archive or Unarchive, and Delete.
Process flow
1Open Timeline
2Search or filter
3Open card
4Read or edit
5Archive, share, or route
Text alternative: Open Timeline. Then Search or filter. Then Open card. Then Read or edit. Then Archive, share, or route.
Step by step
1
Open Timeline and enter a word in Search.
2
Add a date range or select a filter.
3
Open See More to read long content.
4
Use Archive to hide an entry. Select Archived to find it later, then choose Unarchive.
Evidence and limitsDelete is a soft deletion in the application record and is intended for entries that should no longer be available in normal views.
07
Organize
Categories, labels, pinning, and reminders
Organization tools help users group entries without moving or duplicating the underlying record.
An entry can have multiple categories such as Project, Idea, Brainstorming, or App DEV. Categories are tenant-scoped and can be created or renamed from the picker.
Pin keeps a card above unpinned results. Background changes the visual card treatment. Reminder stores a date, time, and optional location.
Make a copy creates a separate private entry. The copy can be edited and routed independently.
Process flow
1Open category picker
2Select or create
3Save labels
4Search by category
5Reuse entry
Text alternative: Open category picker. Then Select or create. Then Save labels. Then Search by category. Then Reuse entry.
Step by step
1
Open Categories from a Recent entry or Timeline card.
2
Select existing categories or type a new category and choose Add.
3
Close the picker after the selected labels appear.
4
Use Timeline search to find entries by any assigned category.
Evidence and limitsCategories describe the entry. A LifeTilo route determines what operational record is created next.
08
Collaborate
Privacy, people, teams, and collaboration
Every entry starts private. The owner can share it with named people, selected teams, or the whole organization.
Only me limits access to the entry owner. People or teams requires at least one active workspace member or team. Organization makes the entry visible within the tenant.
Teams are created in Admin by selecting a team name and active member names. Sharing with a team uses that managed membership list.
Workspace roles currently include Owner, Workspace Admin, Collaborator Editor, Collaborator Viewer, and Auditor-style access where configured. Owners and permitted editors can manage records within their scope.
Tenant boundaries prevent one organization from automatically accessing another organization’s records.
Process flow
1Private entry
2Choose audience
3Validate members or teams
4Save sharing
5Authorized access
Text alternative: Private entry. Then Choose audience. Then Validate members or teams. Then Save sharing. Then Authorized access.
Role and collaboration matrix
Capability
Owner
Workspace Admin
Editor
Viewer
Create private entry
Yes
Yes
Yes
Pending role policy
Edit owned or shared entry
Yes
Within authority
When assigned
No
Change sharing or remove media
Yes
Within authority
Owner approval required
No
Manage members and teams
Yes
Yes
No
No
Step by step
1
Open the Collaborator control on a Timeline card or the sharing control in the composer.
2
Choose Only me, People or teams, or Organization.
3
For People or teams, select the recipients and press Save sharing.
4
Confirm the privacy badges on the entry card.
Evidence and limitsAdmins receive operational and audit visibility according to role. That does not automatically make every private entry shared.
09
Collaborate
Route entries to LifeTilo
Routing converts a reviewed Conscious Log entry into a LifeTilo destination while preserving the source entry and its history.
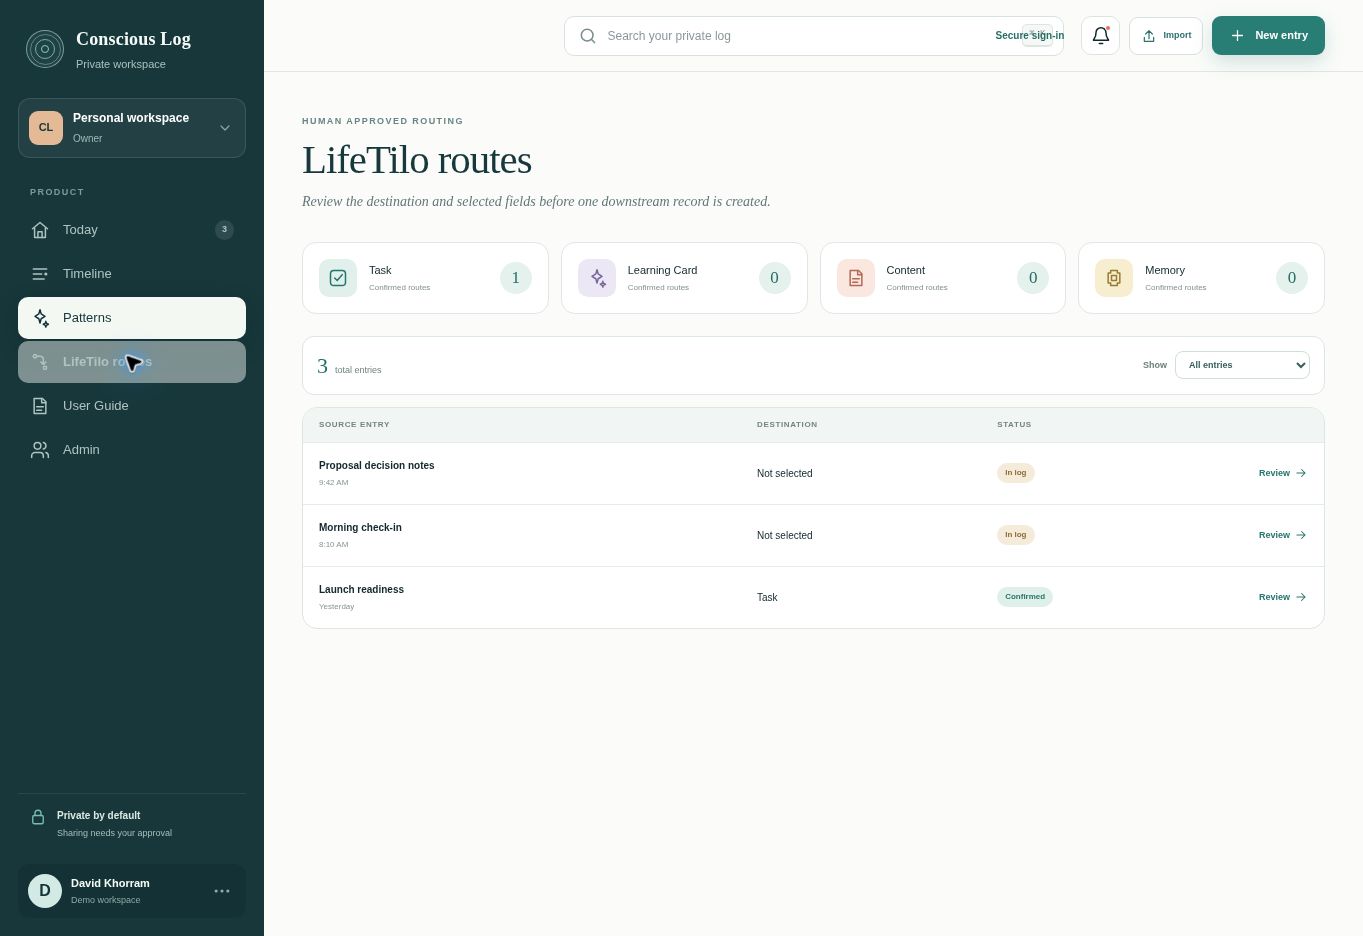
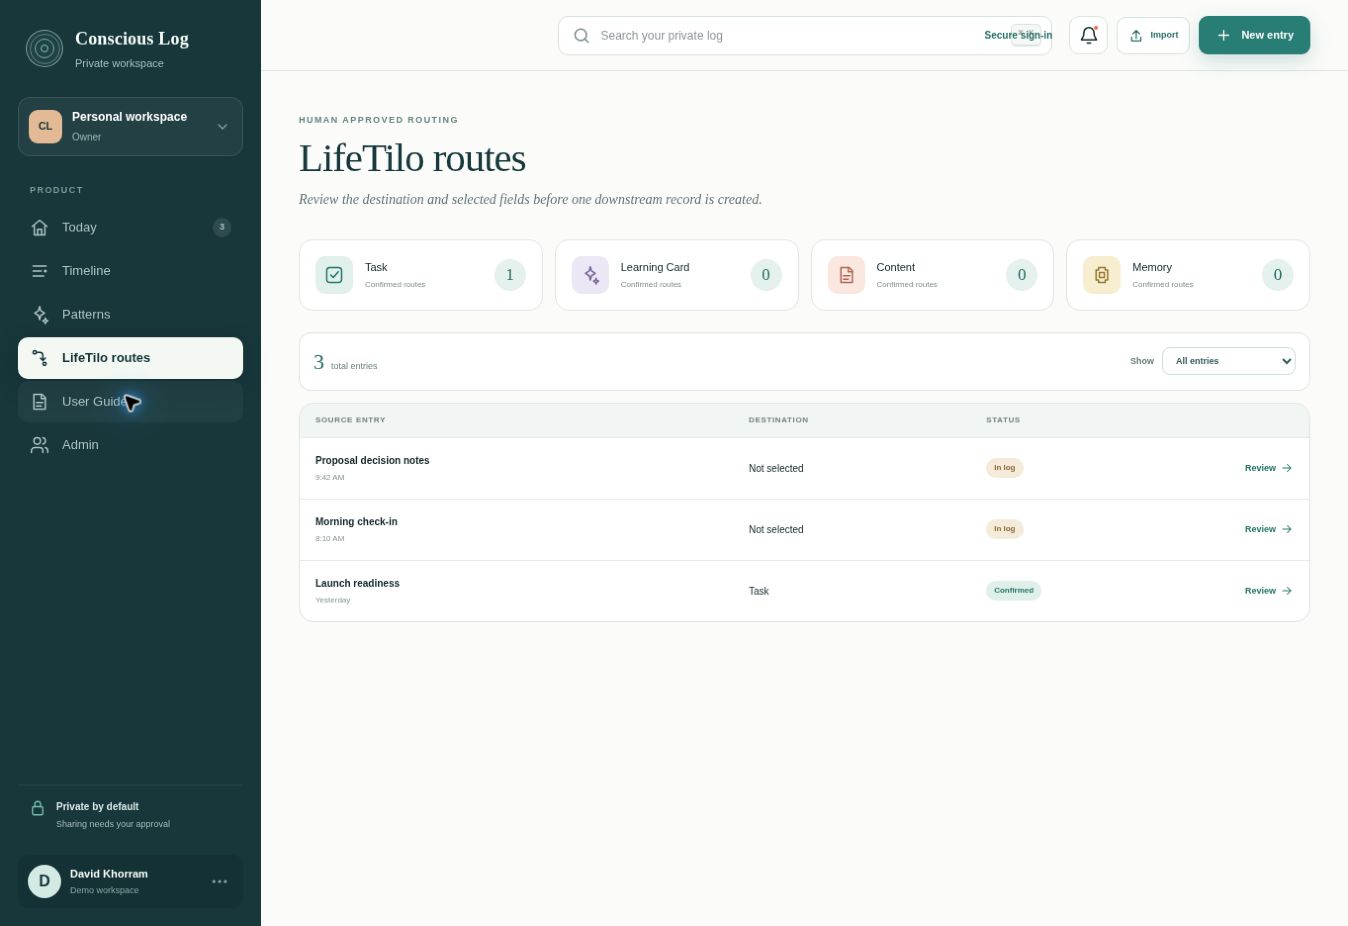
LifeTilo routes is the handoff register for Task, Memory, Learning Card, and Content destinations.Verified screen and tested navigation
Task receives the Conscious Log title as the task title, the body as notes, and related media as an attachment when supported.
Memory receives the title and body as reusable personal or organizational memory. Learning Card receives the title and explanatory body. Content receives the title and body for later publishing work.
The source card shows its destination and a route count. Repeated routing is recorded, and Timeline can filter records that have or have not been routed.
The routing confirmation is the human approval point. Review the title and body before approving the destination.
Process flow
1Approved entry
2Choose destination
3Confirm handoff
4Create LifeTilo record
5Record route evidence
Text alternative: Approved entry. Then Choose destination. Then Confirm handoff. Then Create LifeTilo record. Then Record route evidence.
Handoff contract
Destination
Title
Body
Attachment
Completion evidence
Task
Task title
Notes
Carried when supported
Route record and destination ID
Memory
Memory title
Memory body
Linked when supported
Route record
Learning Card
Card title
Learning content
Linked when supported
Route record
Content
Content title
Draft body
Linked when supported
Route record
Step by step
1
Select Route on an entry.
2
Choose Task, Memory, Learning Card, or Content.
3
Review the destination fields and approve the route.
4
Open LifeTilo routes to confirm the destination and source relationship.
Evidence and limitsRouting is a handoff. The Conscious Log author owns the source until approval, then the destination workflow determines the next owner and status.
10
Organize
Bulk import
Import creates multiple Conscious Log entries from a prepared file and gives the administrator a review step before committing records.
Supported import formats shown in the app include CSV, JSON, TXT, and Markdown. The mass-import workflow is designed around Title, Entry or Body, and Category columns.
CSV should use a header row such as title, entry, category. Multiple categories can be separated according to the preview guidance. JSON should contain an array of entry objects.
The import page explains supported structure and file limits, parses the file into a preview, reports rejected rows, and requires confirmation before writing entries.
Google Sheets should be exported as CSV before upload. PDF and Word files are supported as single entry attachments for AI summarization, not as the structured bulk-import format currently shown.
Process flow
1Prepare file
2Parse and validate
3Review rows
4Commit import
5Confirm in Timeline
Text alternative: Prepare file. Then Parse and validate. Then Review rows. Then Commit import. Then Confirm in Timeline.
Step by step
1
Prepare a CSV with title, entry, and category headers.
2
Select Import from the top bar or Admin.
3
Choose the file and review the parsed rows and validation messages.
4
Commit the approved rows, then confirm the imported records in Timeline.
Evidence and limitsUse approved content only. Import records remain tenant-scoped and retain the visibility assigned by the import workflow.
11
Start here
Troubleshooting and recovery
Status messages on the composer and cards identify whether saving, upload, or AI analysis needs attention.
413 while processing a file means the request exceeded the accepted server size. The current uploader uses chunked transfer for larger files; retry after refreshing and confirm the file is within the displayed limit.
AI processing needs setup means the OpenAI API key or model route is missing. Admin must configure the environment and Model routing.
OpenAI API credits are exhausted means billing credit is unavailable in the OpenAI Platform account connected to this tenant. Add credits, then select Try AI analysis.
AI key needs attention indicates an invalid or revoked key. AI connection failed indicates a network or provider response problem. Rate limited means wait briefly and retry.
If an entry saves without appearing, clear Timeline filters, check Archived, and search the generated title or body wording.
Process flow
1Read exact message
2Confirm saved state
3Fix setup or filter
4Retry safely
5Escalate with evidence
Text alternative: Read exact message. Then Confirm saved state. Then Fix setup or filter. Then Retry safely. Then Escalate with evidence.
Searchable error directory
Message
Likely cause
User-safe fix
Escalate with
413 while processing the file
Request exceeded accepted size
Refresh and retry within displayed limit
File type, size, time
AI processing needs setup
Key or model route missing
Ask Admin to configure AI
Purpose and tenant
API credits exhausted
Provider balance unavailable
Add OpenAI API credits, then retry
Call time and model
Entry not visible
Filter, archive, or generated title
Clear filters and search body text
Save time and entry wording
Step by step
1
Read the exact status message and confirm whether the entry itself saved.
2
Open Timeline, clear search and date filters, and check All entries plus Archived.
3
For AI errors, correct Admin setup or credits, then press Try AI analysis on the saved card.
4
For recurring failures, record the time, user, file type, file size, entry title, and exact message for the administrator.
Evidence and limitsNever place an API key, password, recovery code, or payment information inside an entry or support message.
12
AI
Patterns and explainable insights
Patterns surfaces observations supported by source entries and displays confidence so the user can inspect the evidence before acting.
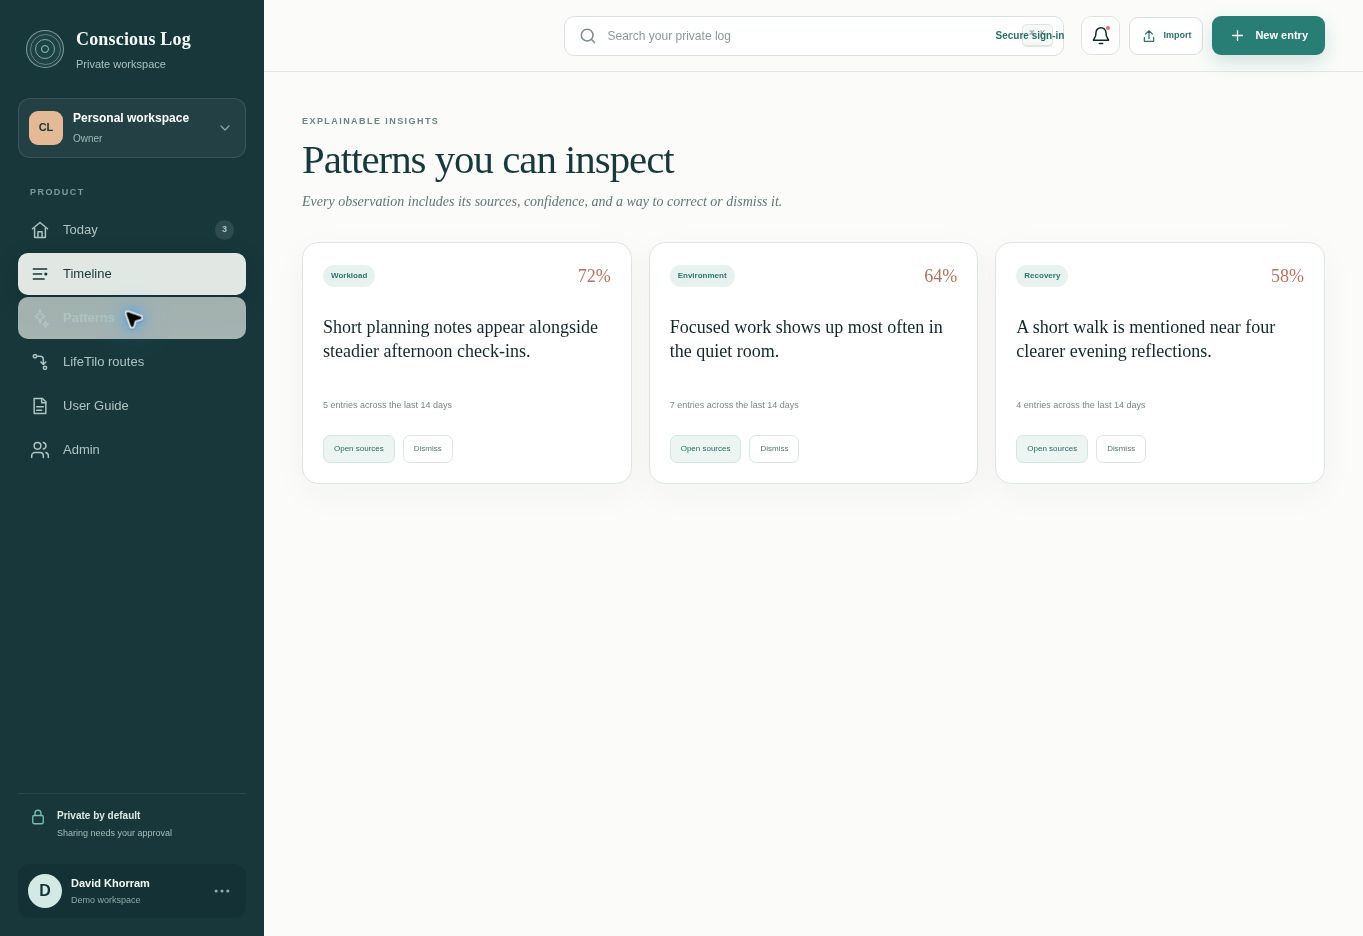
Patterns present inspectable observations supported by Conscious Log entries.Verified screen and tested navigation
A pattern names the observation, the number of source entries, and a confidence percentage.
Users can review the supporting entries and should correct or dismiss an observation that does not match their situation.
Patterns are guidance. They do not change, route, share, archive, or delete an entry without a separate user action.
Process flow
1Source entries
2Pattern analysis
3Confidence shown
4Human inspection
5Use, correct, or dismiss
Text alternative: Source entries. Then Pattern analysis. Then Confidence shown. Then Human inspection. Then Use, correct, or dismiss.
Step by step
1
Open Patterns from the left navigation.
2
Choose an observation and inspect its source-entry count and confidence.
3
Review the underlying entries for context.
4
Use the finding as input for a new entry or route only after human review.
Evidence and limitsVerified screen captured from the current demo workspace. Pattern correction and dismissal persistence require a signed-in validation session.
13
Collaborate
Integrations and developer extensions
The verified external handoff is LifeTilo routing. A public developer API, webhooks, Slack, Microsoft Teams, email sync, and calendar sync are not exposed in the current interface.
LifeTilo receives approved Task, Memory, Learning Card, or Content records from Conscious Log.
The route preserves the source capture ID and destination metadata for audit and repeat-route tracking.
Google-based sign-in is an identity service. It is separate from importing Google Sheets content, which currently requires CSV export.
Future API documentation must define authentication, scopes, pagination, rate limits, idempotency, webhook signatures, retries, and redacted logging before publication.
Process flow
1Approved source entry
2Route contract
3LifeTilo destination
4Status and ownership
5Auditable link
Text alternative: Approved source entry. Then Route contract. Then LifeTilo destination. Then Status and ownership. Then Auditable link.
Step by step
1
Use LifeTilo routes for the currently supported external workflow.
2
For bulk spreadsheet intake, export Google Sheets as CSV and use Import.
3
Treat any unlisted integration as Not verified.
4
Ask an administrator before connecting any new provider or sharing tenant data.
Evidence and limitsDocumented and screen-verified for LifeTilo routing. All other named integrations remain Not verified.
14
Start here
Product updates, training, and maintenance
The guide should be reviewed whenever a navigation label, field, workflow, role, model route, error message, or privacy rule changes.
The guide itself is searchable and organized by capability and document section.Verified screen and tested navigation
Release-note entries should include version and date, changed behavior, affected roles, privacy or security impact, required action, and updated guide links.
Short tutorials should focus on one outcome, show the starting screen, list exact clicks, include captions or a transcript, and link back to the written procedure.
Guide owners should review search terms and support failures monthly, then replace outdated screenshots after interface changes.
Current guide evidence uses safe demo screens captured on August 22, 2026.
Process flow
1Product change
2Identify affected guide
3Update text and screen
4Run checks
5Publish revision
Text alternative: Product change. Then Identify affected guide. Then Update text and screen. Then Run checks. Then Publish revision.
Step by step
1
Record the product version and owner for each guide revision.
2
Update the affected chapter and its screenshot during the same release.
3
Run navigation, link, keyboard, mobile, privacy, and error-recovery checks.
4
Publish the guide change with the application release note.
Evidence and limitsThe embedded product overview video is the currently verified educational resource. A formal webinar library and public changelog are pending.
15
Admin
Administration and governance
Admin manages organizations, membership, teams, capabilities, AI operations, imports, agents, scheduled prompts, and audit evidence.
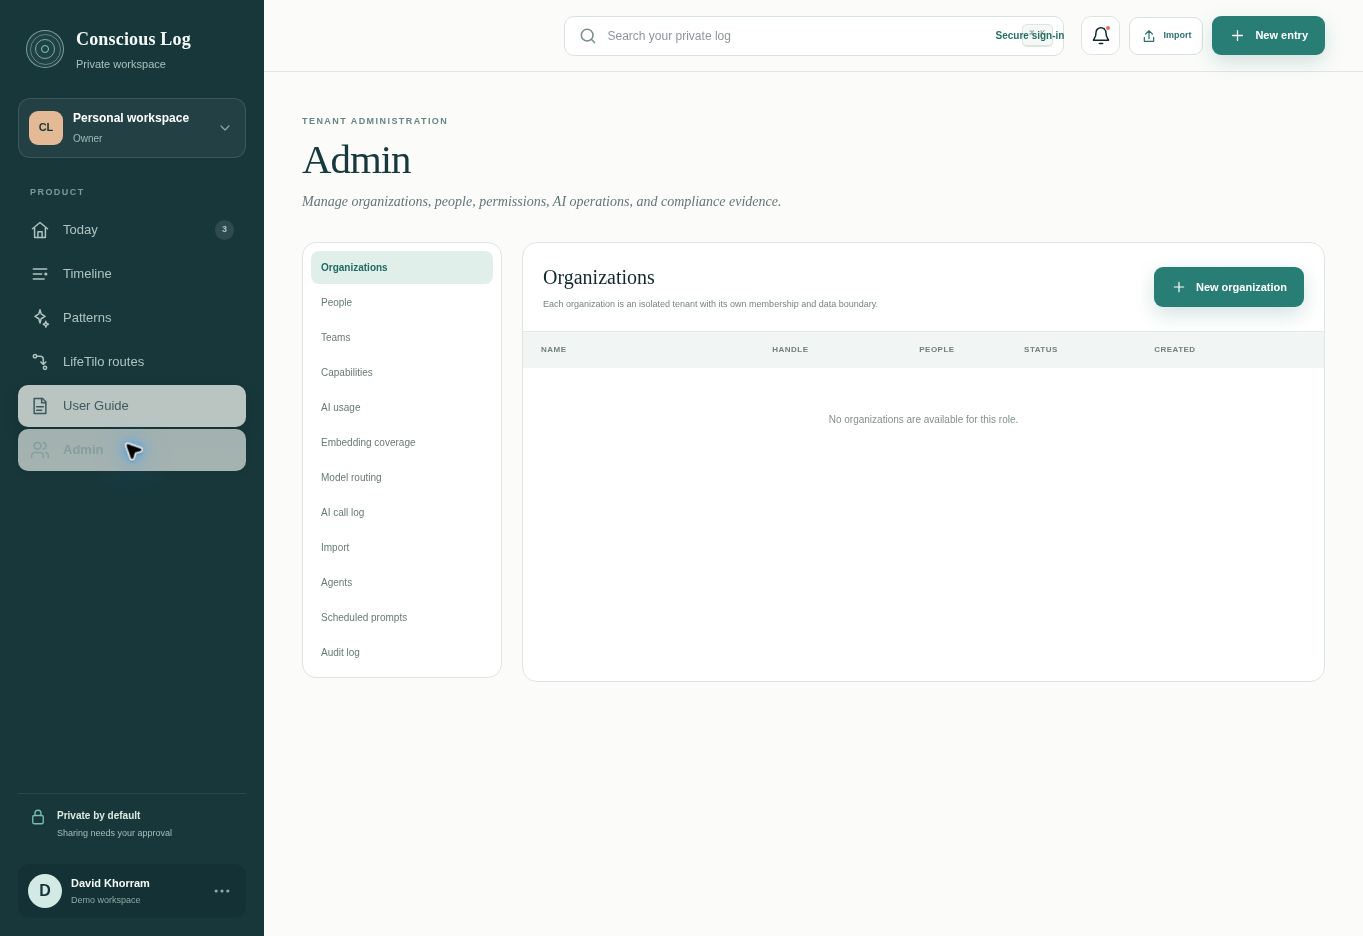
Admin groups tenant, people, team, AI, import, agent, scheduled prompt, and audit controls.Verified screen, Owner demo role
People: invite members, assign roles, see invitation status, resend access, and verify acceptance after matching sign-in.
Teams: create named groups and select active members. Teams become available in entry sharing.
Capabilities: review tenant feature availability and RBAC boundaries. Model routing: select default and purpose-specific OpenAI models and reasoning effort.
AI usage and AI call log: review call counts, token estimates, date-range USD cost, per-user usage, latency, model, purpose, and failures without copying private entry text into the admin report.
Import: review supported formats and commit tenant-safe bulk records. Audit log: review actor, action, resource, outcome, time, and redacted metadata.
Governance: use least privilege, review pending invitations, audit role changes, inspect AI failures and spend, and test recovery procedures on a recurring schedule.
Process flow
1Set tenant policy
2Assign least privilege
3Monitor AI and access
4Review audit evidence
5Correct and document
Text alternative: Set tenant policy. Then Assign least privilege. Then Monitor AI and access. Then Review audit evidence. Then Correct and document.
Admin recurring review
Cadence
Review
Evidence
Weekly
Pending invites, failed AI calls, unusual access
People, AI call log, Audit log
Monthly
AI cost, model routes, teams, imports
AI usage and change events
Quarterly
Roles, tenant isolation, retention, recovery
Access review and test record
Offboarding
Remove access and reassign shared work
Membership and audit events
Step by step
1
Invite the initial members and confirm each invitation status.
2
Create teams and assign only the members who need group sharing.
3
Review Model routing and run one approved AI test.
4
Review AI usage and audit events weekly, then inspect roles and retention settings quarterly.
Evidence and limitsBilling subscription management, SSO policy configuration, public API credentials, webhooks, and formal support SLAs are not currently verified in this application interface.